Authorize.net, founded in 1996, is one of the internet's oldest online payment methods—and it continues to be a popular choice for payment processing platforms. Over 430,000 merchants of any size have used Authorize.net to handle a billion transactions every year, and it is supported by many of the major hosting platforms like Shopify, WordPress, and BigCommerce. Using Authorize.net's streamlined and straightforward API, your business can instantly and securely interact with customers by integrating with FileMaker.
Authorize.net Account Setup
To begin, you must first have an account. If you don't have a merchant account, you can easily create a sandbox account to test with. To follow along with this article, it is recommended to create and use a sandbox account.
Once your account is created and you've logged in, one of the first screens you'll see is a popup. Here, you can change your Authorize.net account to a live version or a test version. For this article, we will switch it to live. No payments will be processed in either mode for a sandbox, but switching it to live allows us to track payments and transactions.
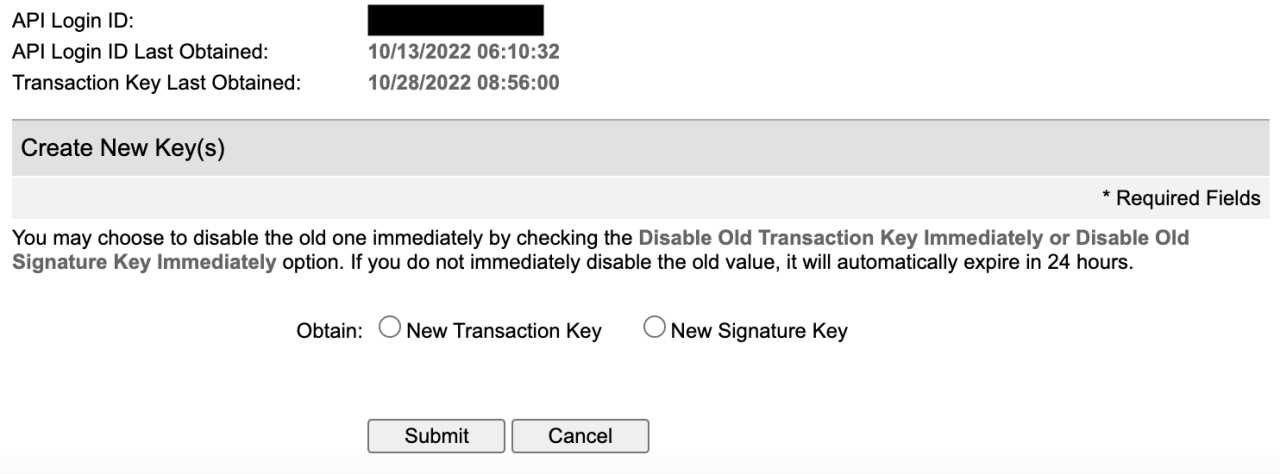
From there, we can get the two pieces of information we need under Account Settings > API Credentials and Keys. We will need the API Login ID and the Transaction Key, which will need to be generated and copied.
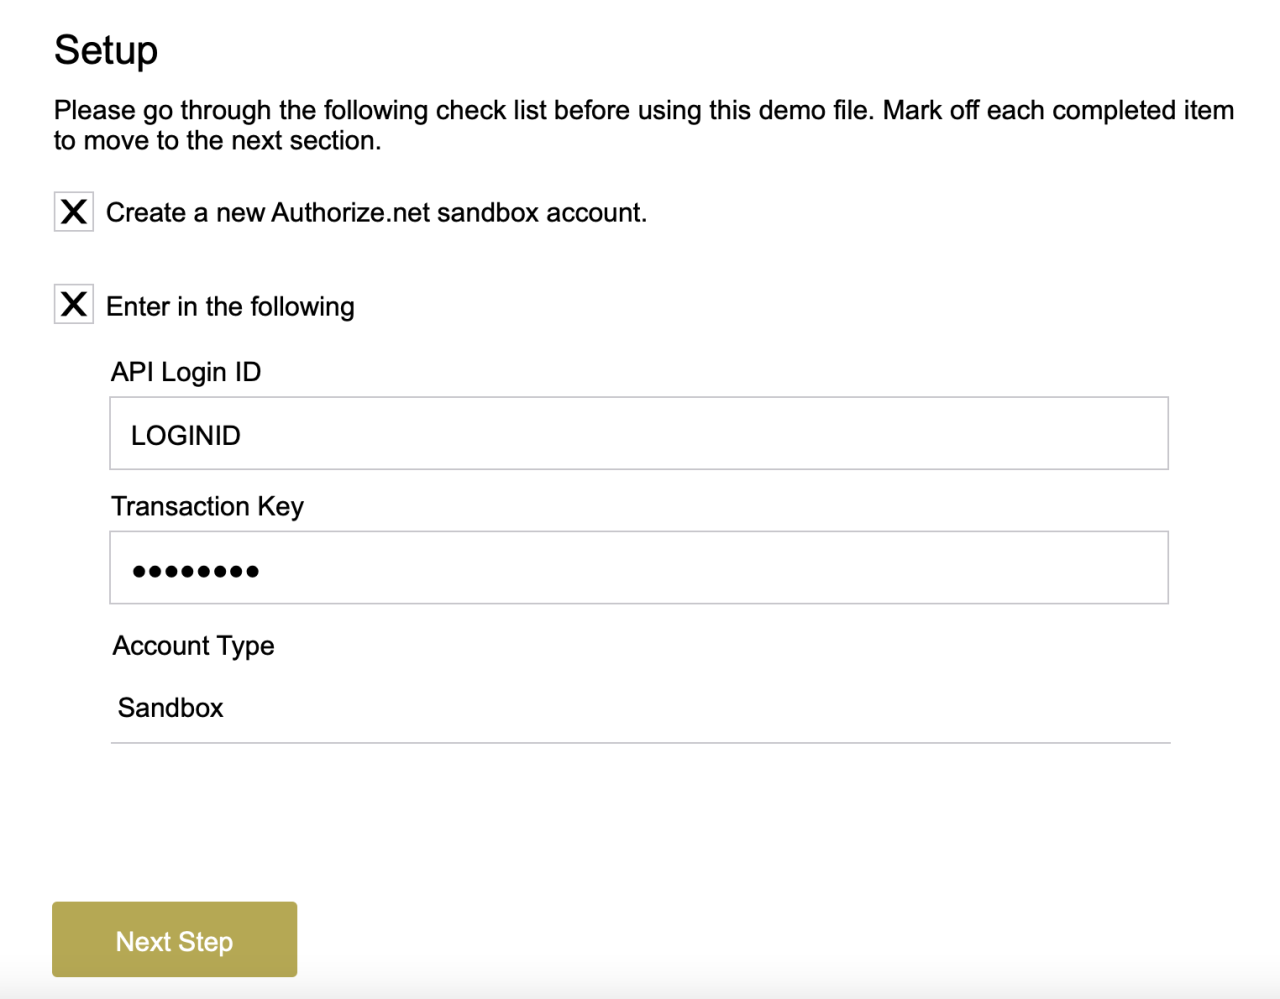
Our next step is to put this information into the appropriate places in FileMaker. We'll put the Login ID and Transaction Key on the setup screen of the test file, as well as select which type of account we have (merchant or sandbox). This will determine the URL of all of our API calls, which is always either https://api.authorize.net/xml/v1/request.api or https://apitest.authorize.net/xml/v1/request.api.
Creating Customer Profiles
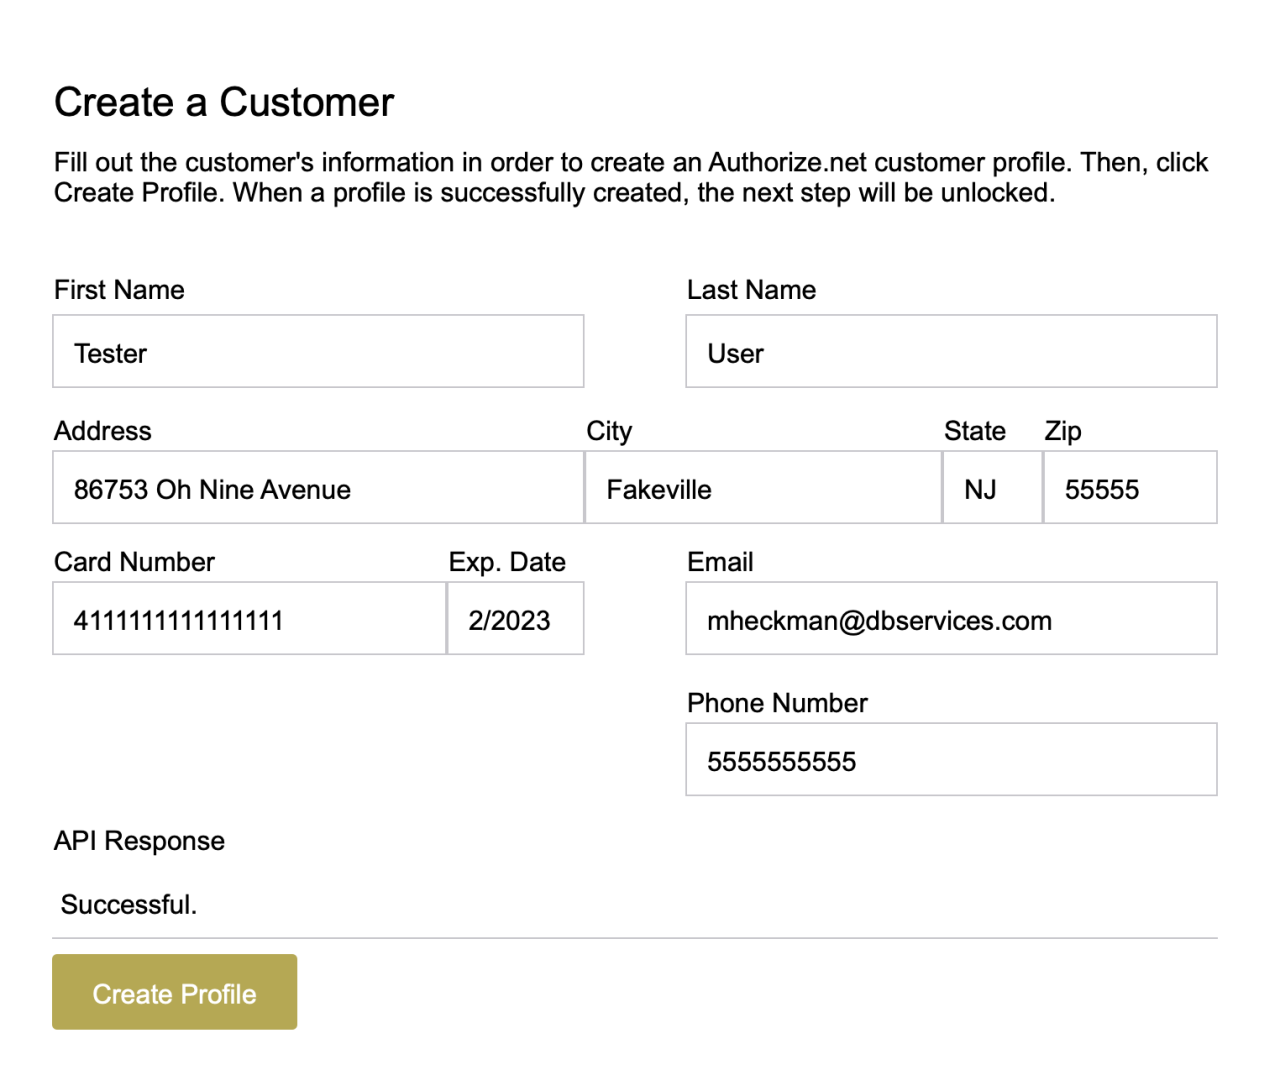
One of the quickest and easiest processes in Authorize.net is setting up a customer's profile—simply plug in their information and let the call do the rest of the work. However, if you're familiar with API calls, you'll notice there's something immediately strange about Authorize.net's API calls: the JSON must be ordered in a certain way, or the call won't work.
The Authorize.net API, which is not based on REST, offers JSON support through a translation of JSON elements to XML elements. While JSON does not typically require a set order to the elements in an object, XML requires strict ordering. Developers using the Authorize.net API should force the ordering of elements to match this API Reference.
This becomes the hardest part of integrating FileMaker and Authorize.net, as FileMaker automatically sorts the JSON alphabetically, which we don't want. Fortunately, there's always a workaround. By using a custom function called JSONSerialReorder, we can order the JSON how we need it, and the calls are back to being easy. Below is an example of using the serial reorder to make a properly formatted JSON element.
JSONSerialReorder (
	JSONSetElement ( "{}" ;
		[ "createCustomerProfileRequest.[0].merchantAuthentication.[0].name" ; $authLoginID ; JSONString ] ;
		[ "createCustomerProfileRequest.[0].merchantAuthentication.[1].transactionKey" ; $authTransactionKey ; JSONString ] ;
		[ "createCustomerProfileRequest.[1].profile.[0].description" ; $description ; JSONString ] ;
		[ "createCustomerProfileRequest.[1].profile.[1].email" ; $email ; JSONString ] ;
		[ "createCustomerProfileRequest.[1].profile.[2].paymentProfiles.[0].customerType" ; $customerType ; JSONString ] ;
		[ "createCustomerProfileRequest.[1].profile.[2].paymentProfiles.[1].billTo.[0].firstName" ; $firstName ; JSONString ] ;
		[ "createCustomerProfileRequest.[1].profile.[2].paymentProfiles.[1].billTo.[1].lastName" ; $lastName ; JSONString ] ;
		[ "createCustomerProfileRequest.[1].profile.[2].paymentProfiles.[1].billTo.[2].company" ; $company ; JSONString ] ;
		[ "createCustomerProfileRequest.[1].profile.[2].paymentProfiles.[1].billTo.[3].address" ; $address ; JSONString ] ;
		[ "createCustomerProfileRequest.[1].profile.[2].paymentProfiles.[1].billTo.[4].city" ; $city ; JSONString ] ;
		[ "createCustomerProfileRequest.[1].profile.[2].paymentProfiles.[1].billTo.[5].state" ; $state ; JSONString ] ;
		[ "createCustomerProfileRequest.[1].profile.[2].paymentProfiles.[1].billTo.[6].zip" ; $zip ; JSONString ] ;
		[ "createCustomerProfileRequest.[1].profile.[2].paymentProfiles.[1].billTo.[7].country" ; "" ; JSONString ] ;
		[ "createCustomerProfileRequest.[1].profile.[2].paymentProfiles.[1].billTo.[8].phoneNumber" ; $phoneNumber ; JSONString ] ;
		[ "createCustomerProfileRequest.[1].profile.[2].paymentProfiles.[1].billTo.[9].faxNumber" ; "" ; JSONString ] ;
		[ "createCustomerProfileRequest.[1].profile.[2].paymentProfiles.[2].payment.[0].creditCard.[0].cardNumber" ; $cardNumber ; JSONString ] ;
		[ "createCustomerProfileRequest.[1].profile.[2].paymentProfiles.[2].payment.[0].creditCard.[1].expirationDate" ; $expirationDate ; JSONString ]
	)
)
The call above perfectly replicates this:
{
    "createCustomerProfileRequest": {
        "merchantAuthentication": {
            "name": "LOGIN_ID",
            "transactionKey": "TRANSACTION_KEY"
        },
        "profile": {
            "merchantCustomerId": "Merchant_Customer_ID",
            "description": "Profile description here",
            "email": "customer-profile-email@here.com",
            "paymentProfiles": {
                "customerType": "individual",
                "payment": {
                    "creditCard": {
                        "cardNumber": "4111111111111111",
                        "expirationDate": "2025-12"
                    }
                }
            }
        }
    }
}
Since we're only using the test environment, we can use a test credit card number. After that, we'll fill in the rest of the customer's information in FileMaker, and make the call to Authorize.net to create our profile.
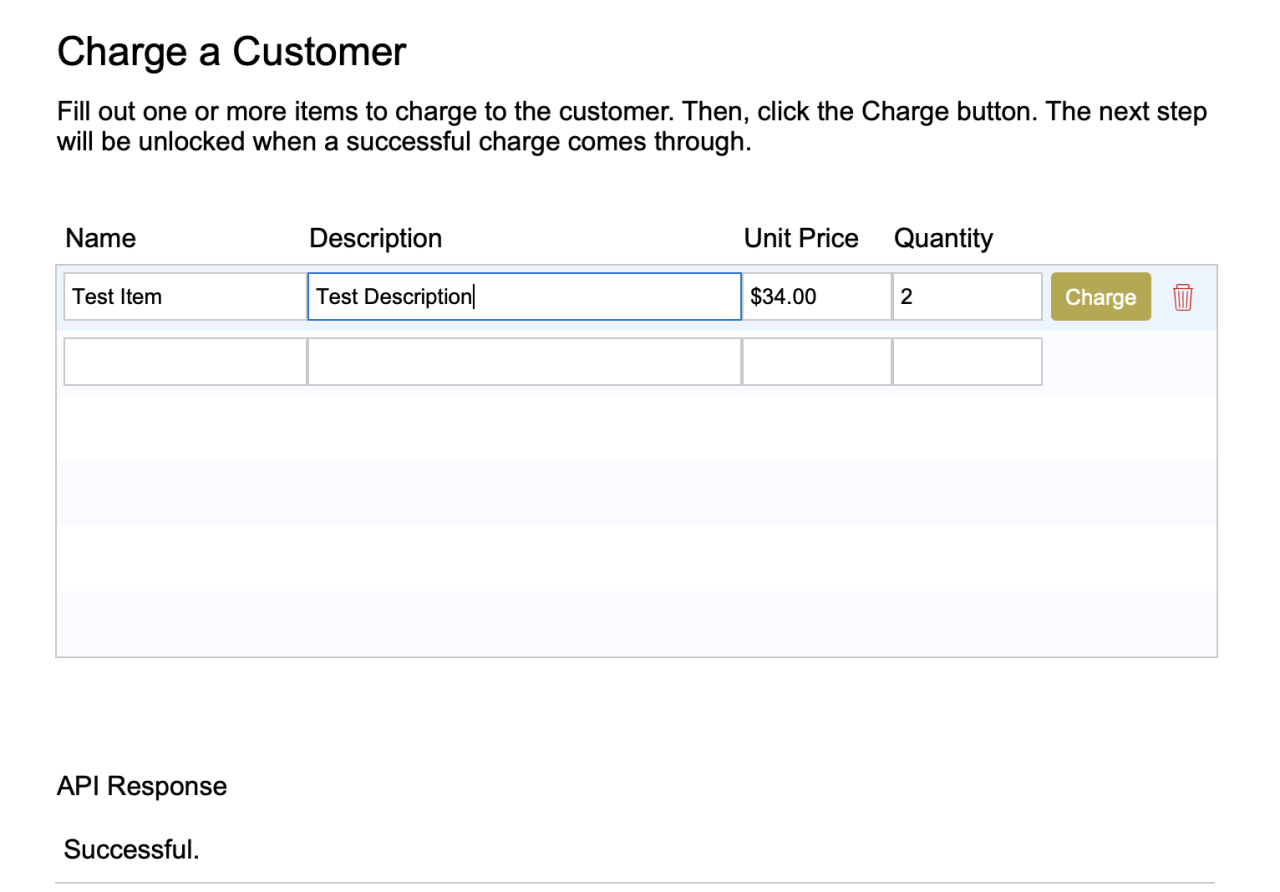
Processing Payments
After our customer has been created, as a very basic transaction, we can charge the customer an item they purchase. This can be done in many ways, such as a subscription, charging the card, or charging the customer profile. The API call for charging a customer looks similar, too:
JSONSerialReorder (
	JSONSetElement ( "{}" ;
		[ "createTransactionRequest.[0].merchantAuthentication.[0].name" ; $authLoginID ; JSONString ] ;
		[ "createTransactionRequest.[0].merchantAuthentication.[1].transactionKey" ; $authTransactionKey ; JSONString ] ;
		[ "createTransactionRequest.[1].transactionRequest.[0].transactionType" ; "authCaptureTransaction" ; JSONString ] ;
		[ "createTransactionRequest.[1].transactionRequest.[1].amount" ; $amount ; JSONString ] ;
		[ "createTransactionRequest.[1].transactionRequest.[2].currencyCode" ; $currencyCode ; JSONString ] ;
		[ "createTransactionRequest.[1].transactionRequest.[3].profile.[0].customerProfileId" ; $customerID ; JSONString ] ;
		[ "createTransactionRequest.[1].transactionRequest.[3].profile.[1].paymentProfile.paymentProfileId" ; $paymentID ; JSONString ] ;
		[ "createTransactionRequest.[1].transactionRequest.[4].lineItems.lineItem.[0].itemId" ; $itemID ; JSONString ] ;
		[ "createTransactionRequest.[1].transactionRequest.[4].lineItems.lineItem.[1].name" ; $name ; JSONString ] ;
		[ "createTransactionRequest.[1].transactionRequest.[4].lineItems.lineItem.[2].description" ; $description ; JSONString ] ;
		[ "createTransactionRequest.[1].transactionRequest.[4].lineItems.lineItem.[3].quantity" ; $quantity ; JSONString ] ;
		[ "createTransactionRequest.[1].transactionRequest.[4].lineItems.lineItem.[4].unitPrice" ; $unitPrice ; JSONString ]
	 )
 )
When a charge comes through successfully, a "merchant email" should be sent through to the email address you used to create the Authorize.net account.
And that's it! A basic and straightforward approach to implementing Authorize.net and FileMaker. You can play around and see what's allowed in a call and what's not. For example, periods can't be allowed in any text, or that will mess up the call. This, among other safety checks, should be addressed before releasing an integration.
Conclusion
By integrating Authorize.net and FileMaker, processing and recording payments can be faster than ever, and the risk of human error is significantly reduced. There's no limit to what you can do between these two systems; pulling processed payments from Authorize.net into FileMaker is just as easy as charging a card. Combining FileMaker and Authorize.net gives your business more time to do what it does best: focus on the customer. If you would like help integrating Authorize.net with your FileMaker application, don't hesitate to contact us!
Did you know we are an authorized reseller for Claris FileMaker Licensing?
Contact us to discuss upgrading your Claris FileMaker software.
Download the FileMaker Authorize.net Integration File
Please complete the form below to download your FREE FileMaker file.