In 2016, Google announced that Gmail has over 1 billion monthly active users. Many companies even leverage Gmail to set up accounts using their company domain name. If you have a FileMaker CRM, or are wanting to have one, adding your email correspondence will help improve the visibility you have over communications with contacts. In this article we will demonstrate how you can import your HTML emails from Gmail directly into your FileMaker system.
Creating a Free Developer Account
The first step of this integration is to create a project in the Google Developers Console if you do not already have one. Once you have created a project, you will then need to enable the Gmail API. Once it is enabled, go to the menu and go to APIs & Services > Credentials. We will need an OAuth 2.0 client ID and secret. If you have not done this before, you will need to create these credentials and set up the OAuth consent screen. We will be using HTTP requests, so you will want to mark that the API will be accessed via a web browser client. You will also need to set the redirect URI to https://dbservices.com or any valid website that will not redirect to something else.
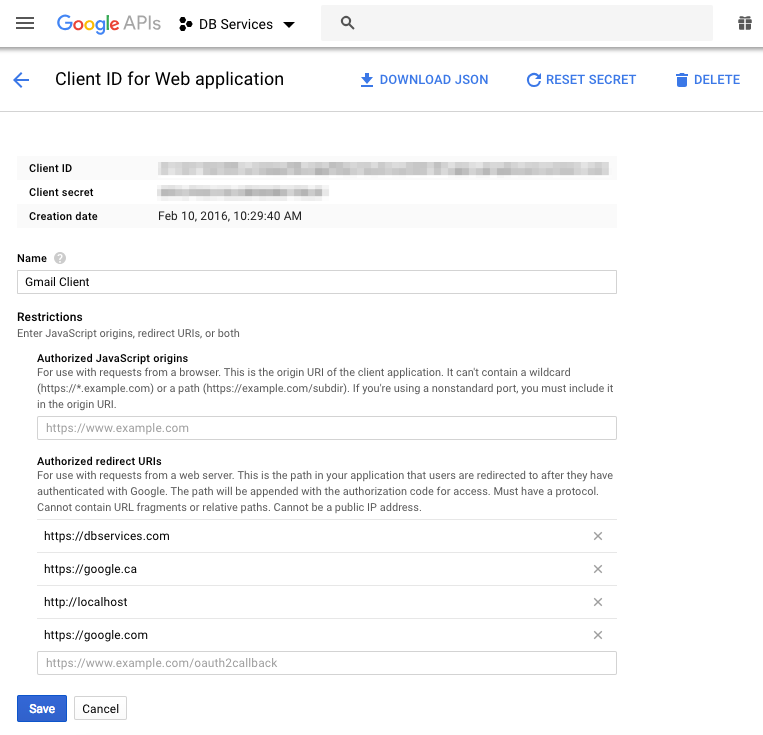
This is only used as a landing page for authentication and does not need to be anything special. Once the Client ID has been created, copy the Client ID and Client Secret into your solution. Keep your client secret hidden from the world as the combination of the Client ID and Client Secret will be used to authorize your solution to access the end user's account.
Authenticating with Google and OAuth 2.0
Once you have your API information, you will need authenticate your solution with the Gmail API. Google provides an OAuth 2.0 playground to view how to authenticate, or you can reference our sample database which accompanies this article. At a high level, in order to authenticate your solution, place the user into a web viewer at the API authentication endpoint. This will prompt the user to log in with their own credentials and choose the account to allow your solution to make the connection. Once they have agreed, they will be sent to the address specified in your redirect URI that was passed in the authentication request. When the user is redirected to the new address, the address will now have a URL encoded parameter, which will be the code needed for the next step.
Set Variable [ $code ; Value: "https://dbservices.com/?code=058baec5-cfd7-42ae-b3ea-c0683fa4b6b5" ]
Once you have extracted the code, you will use the code provided, along with your ID and secret to get your access token which will be used to make any API requests.
Making Requests and Parsing the Response
Before you make requests to the Gmail API, it is important that you understand JSON and cURL. Importing emails from Gmail requires 4 main requests: List Messages, Get Message, Get Attachment, and Modify Message. The List Message request will be needed to pull all messages based on the query provided. For example, you can find all emails after a certain timestamp by using the following:
Set Variable [ $cURL ; Value: "-X POST
                               --header \"authorization: Bearer XXXXXXX\"" ]
Insert from URL [ Select ; With Dialog: Off ; $result ; ""https://content.googleapis.com/gmail/v1/users/me/messages?q=after%3A" & $startTimestamp" ; $cURL ; Do not automatically encode URL ]
Keep in mind that the timestamp will need to be formatted for UNIX. Once a successful request has been made, a JSON-encoded response will be returned with the list of message IDs. You will then be able to use the function JSONGetElement() to pull any information out of the response that you wish.
{
 "messages": [
  {
   "id": "1234567890",
   "threadId": "8675309"
  }
 ],
 "resultSizeEstimate":1
}
For example, you can get the ID by using the following function:
Set Variable [ JSONGetElement ( $result ; "messages[0]id") ]
Now that you have the ID of the message, you can use the Get Message request, which will give you the details of the message. Some messages will include an attachment ID, which you will then need to use the Get Attachment request. Finally, if you need to mark the message as read, or archive it, or just change where the message is located, you will need to use the Modify Message request. The Modify request is a little different from the others as it is a POST rather than a GET, so you will have to pass the extra information as JSON in the cURL options.
Set Variable [ $cURL ; Value: "-X POST
                               --header \"authorization: Bearer XXXXXXX\"
                               --header \"Content-Type: Application/json\""
                               --data @$modifyJSON" ]
Insert from URL [ Select ; With Dialog: Off ; $result ; "https://www.googleapis.com/gmail/v1/users/me/messages/" & $messageID & "/modify" ; $cURL ; Do not automatically encode URL ]
I strongly suggest taking a look at our accompanying example file as certain portions of the API can be a bit tricky. For instance, pulling the details of the message is a little complicated and you will need to implement loops to traverse through the response to grab the specific information that you need.
Conclusion
Integrating your FileMaker app with Gmail will greatly improve your business's visibility over communication with your company's contacts. Feel free to contact us if you need further assistance or to discuss getting your Gmail account integrated with FileMaker.
Did you know we are an authorized reseller for Claris FileMaker Licensing?
Contact us to discuss upgrading your Claris FileMaker software.
Download the FileMaker Gmail Integration File
Please complete the form below to download your FREE FileMaker file.

